3D OBJECT DESIGN FINAL: Project Process and Overview
TEMPLATES
RHINO RENDER
PROTOTYPE 1
The very first model prototype. I made it with paper with my printed template. It was small in size, making it hard to piece and tape together. This prototype, despite all the times it tried my temper, allowed me to see the errors within my template. It encouraged me to go back to my digital template to revise it, making it less hard to put together for later prototypes.
PROTOTYPE 2
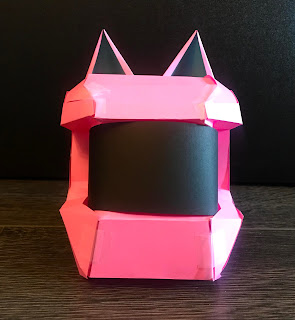
For this prototype. I used coloured paper to lay out the colours I wanted for the final product. It is much bigger than my last prototype, as it is the size of my hand, which made it less frustrating to piece it together. My revisions helped make this prototype more smooth looking and better put together. The only issues I had with this prototype at the time were the visible tape and the shape of the visor. With the visor, I wanted to have it round, but it gave me complications as it didn't quite fit well with the other pieces.
FINAL
This was made using cardstock paper, making the design less fragile. I had put tabs into the templates for the design, allowing me to piece the parts together without showing the tape and glue that helped put them together. When making the visor, I decided to ditch the idea of having it be round. As a result, the design felt more unified as a whole and the visor fit together more easily.
FINAL AND PROTOTYPES SIDE-BY-SIDE COMPARISON
I majorly learned the importance of the loop of creating prototyping and going back to design. I learned that this process is critical in helping me refine, as it makes me see and experiment with what will and won't work when it comes to finalizing my design. It is a process that teaches me to be more patient to achieve my vision, as this loop can be very time-consuming but rewarding in the long run. I'm not good at making things with my hands, so seeing this project pull through is very gratifying to me and teaches me the importance of this approach to the process. I can apply this process to my future projects to help me with my goals when it comes to my projects.


.jpg)

.jpg)
Comments
Post a Comment